Getting a great granite install can be puzzling for the do it yourselfer. After all, so many things can go wrong with project that requires so many "moving parts". Setting out to install a granite countertop may seem like a matter of following a set of specific steps. And this is true; to a certain degree. However, there are a variety of issues that could "derail" the project if the installer is not aware of the nuances that inherently come with a granite countertop installation.
In this post, we are going to take a brief look at some of the common tips that fabricators keep in mind when they are installing granite countertops. Along the way, we will consider some solutions to some of these issues.
Techniques for Supporting Granite
The first granite installation tip that we want to take a look at for DIY kitchen countertops is supporting the stone. At first, this may seem counter-intuitive because granite is such a hard material. However, granite is also very heavy compared to the amount of distance it spans in countertop installs. Here, we will look at a couple of specific cases where the support of the granite might need to be considered. Let's examine two specific instances:
The first area in which additional support for a granite installation might be needed is in the case of a countertop overhang. If your installation is one in which the granite slab will hang over the edge of a cabinet, you may want to consider adding support to part of the granite that hangs over. There are a couple of design features that create this situation.
Whether you choose to add this kind of support may depend on how much stone is hanging over the edge. You will find recommendations based on a variety of factors if you search online. However, the Natural Stone Institute published an authoritative guide with very explicit diagrams and explanations of techniques for installers. Some of these techniques include directives on when to provide support for overhanging stone
1.
In the document, corbels are used to support the stone overhang. However, some designs incorporate a floating countertop in them. In these cases you may want
floating countertop support brackets to provide added strength to your countertop installation.
Another case where granite countertops need supported (reinforced) is in front of sink cutouts. This thin strip of granite (or other stone) can often times require some reinforcement to help support the weight of the stone spanning the gap between countertops
2. This need is clearly spelled out in the installation guide by the NSI mentioned earlier.
Under the Topic of
Reinforcement Techniques, rodding is listed as one of the methods suggested for offering support to stone that might be weaker due to a variety of circumstances; including places where substantial stone is removed from the slab3.
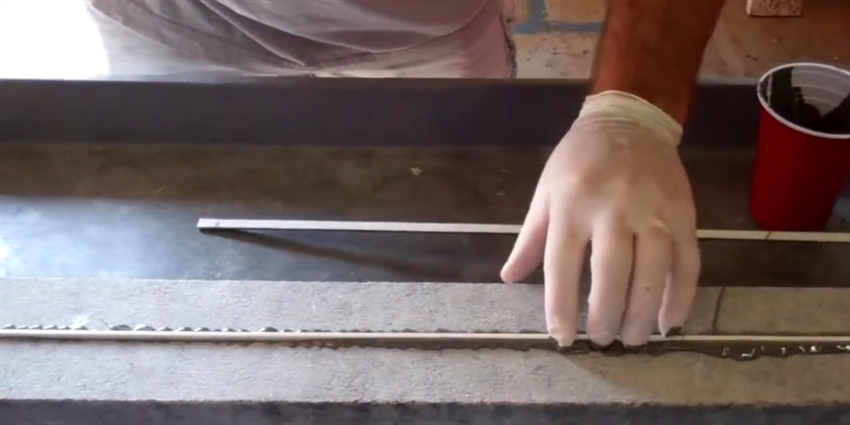
Rodding Technique to Reinforce Granite Countertops
Rodding stone to reinforce the material is an effective way to prevent cracking and breaking in places where the stone could be susceptible to pressure. In such cases, using rodding to suppport the granite or other stone surface can protect your investment from damage requiring you to come back to the proverbial "drawing board". The following demonstration video shows how to reinforce granite using fiber rodding.
Hiding Seams In Granite
Another area in which do it yourselfers may like tips is when it comes to hiding seams. Inevitably there will be seams in your granite surface when you complete a project. The big question is: "How noticeable will the seams be?" The answer to that question highly depends on how you construct the surface, what adhesives you use to bond the stone, and the methods use for creating the joints. Let's briefly look at these factors.
Techniques to Produce Clean Seams
Various fabricators use an array of methods and techniques to get well-hidden seams on granite countertop surfaces. The cleaner the edges of the stone are, the cleaner the seam can be. Additionally, the size of the seam can either hide it, or make it stand out. As a result, professionals will often times use a seam setter to pull the two stones together when bonding them together. Setting the seam in this way narrows the gap between the stone edges and makes the seam less noticeable.
Another technique for hiding seams is to dress the edge so there is as straight of a line as possible. The edge itself and the width of the seam are not the only factors to consider.
Color Matched Adhesives Blend Stone Edges
The idea is simple; the better your adhesive's color matches the stone you are bonding, the harder it is to notice the seam. So choosing a colored bonding agent for your project will contribute to a less noticeable seam. There are many adhesives available for bonding stone. You may be intrigued by the many different kinds of glue available for stone. However, most adhesives on the market are formulated for particular applications.
If you are looking for a versatile colormatch adhesive that is usable in virtually all environments, you may want to research Glaxs by Tenax. It is an effective option designed to work with a variety of stone types in an array of environments.
Laminate Edges for Virtually Invisible Seams
Perhaps one way to completely hide a seam, is to put it on a 45° edge so that it is virtually invisible. Combining edge lamination with clean edges, color matched adhesive and tight seams will yield the best results.
In the video below, you can see the concept of 45° lamination clearly. However, it does require some specific stone tools. One such tool is a bridge saw capable of making a 45 degree cut. This style of cut allows the installer to bond two pieces of stone on a 90° edge. Of course the Push and Glue tool featured in this video is also a nice thing to have as well.
As you can see, there is often more to a project than meets the eye. Doing a countertop install yourself might seem like an easy process, but it can get complicated rather quickly. By researching the techniques that professional fabricators use and looking into the tools available you can get the best results. However, be aware that know-how along with the proper tools work together to yield the best results.